Working with Blocks
Blocks are pre-packaged parts of a web page. Some examples of blocks include:
- Hero image
- Call to Action
- Testimonials
- Contact Form
- Content Columns
To insert a Block:
- Place your cursor where you want to insert the block (typically on a new line).
- Click the 🧩 Blocks button
- Select the block you want to insert
- Replace any placeholder text/images with your content
- Rinse and repeat
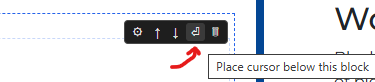
Note: Sometimes you will want to begin typing immediately after a block or insert another block after an existing block. It is difficult to place your cursor after a block or other elements sometimes. To help with this, move your mouse over the outermost outline for the block, and the block settings menu will appear. Click the Return icon to move the cursor immediately after that block.
Built-in blocks
The extension ships with a set of ready-made blocks — Hero, Call to Action, Testimonial, Contact, 3-Column Features, Video Embed, Form Embed, Lottie Animation, and two List blocks. Each is styled for your site's active CSS framework; a block without markup for your current framework shows up disabled rather than disappearing, so you know it exists even before it's available for that framework.
The two embed blocks (Video and Form) wrap an <iframe> for things like a YouTube video or a forms embed:
- Video Embed keeps a fixed 16:9 aspect ratio, right for video.
- Form Embed has no forced ratio, since form height varies by content rather than width — it starts at a reasonable minimum height that you adjust to fit.
For either embed block, hover over it and click the 🔗 button in the toolbar that appears, then paste in the embed snippet (or just the URL) your provider gave you. There's no need to switch to Code view for this.
Lottie Animation inserts a lightweight, scalable animation exported as a .json file, instead of a video or GIF. See Adding Animated Images for the full walkthrough, including why it only shows a placeholder while you're editing.
List: Links and List: Directory render an admin-managed List — a blog index, a staff directory, anything with repeating entries — that you set up once from ⚙️ Site Admin → 🗂️ Lists. See Lists for the full walkthrough.
Block Settings
In the editor window, you may see dashed lines enclosing some of your content. These are visual indications of <div> wrappers, the universal content container in HTML.
If you move your mouse toward the top of each box, you'll see a menu appear in the upper right. This is the container editor, which lets you edit the classes and IDs of each <div> in the page.
Blocks are special self-contained divs, and they have additional features and settings, including:
- Cog: Allows you to change ID and classes of the block
- Up Arrow: Moves the active block up on the page
- Down Arrow: Moves the active block down on the page
- Return Icon: Moves the cursor immediately below the active block, allowing you to begin typing or insert other elements outside of the current block
- Trash Can: Delete the active block
 Topics