Images and Assets
Upload, reuse and fine-tune images, PDFs and other files for your pages.
Adding an image
Click 🖼️ Image in the editor toolbar, pick a file, and WebHaste uploads it into your project's assets/ folder and inserts it where your cursor is — one step. To reuse a file you've already uploaded, or to add other kinds of files, click 📎 Assets.
The Project Assets dialog lists everything in assets/. Use Upload New to add files, and click a file to insert it at your cursor — images go in as pictures, other files as links. It holds images (PNG, JPG, GIF, SVG, WebP), PDFs, and the .json files used for animated images.
Resizing large photos
A photo straight from a phone or camera is often far bigger than a web page needs, which makes pages slow. WebHaste can shrink them for you:
- In the Assets dialog, tick Resize large images for web before you upload. It's unchecked every time the dialog opens, so resizing only happens when you ask for it.
- With the toolbar's 🖼️ Image button, WebHaste checks the picture and, if it's oversized, asks whether to resize it. OK resizes it; Cancel uploads it at full size.
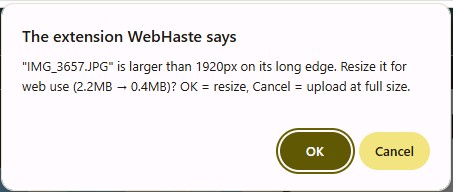
The prompt tells you how much smaller the file will be, so you can decide at a glance.
The longest edge is reduced to the limit set in Image Resize Max Dimension in Site Settings — 1920 pixels unless you change it; a photography site might want more, a mostly-text site less. Resizing applies to PNG, JPG and WebP files, and it works on the uploaded copy — your original stays on your computer. Because the picture is saved again at a lower size or quality setting, a resized image may be a little less sharp than the original; this typically isn't noticeable on a website. Animated GIFs, SVG and Lottie files are never resized.
Very large files
WebHaste warns you before uploading any file over 10 MB, and lets you continue. It can't know your host's real limit — Cloudflare Pages, for instance, rejects individual files over 25 MB, and that error only appears when you publish. If a file is that large, resize or compress it first.
Image properties
Click any image on a page to open Image Properties:
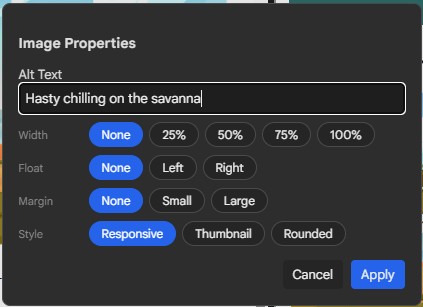
- Alt Text — WebHaste starts it off as the file name, so replace it with a short description of what the picture shows, read aloud by screen readers and used by search engines. Describe the picture's content and purpose; don't write "image of". If the image is purely decorative, leave it empty.
- Width — none, 25%, 50%, 75% or 100% of the available space.
- Float — none, left or right, so text wraps around the picture.
- Margin — none, small or large breathing room around it.
- Style — Responsive, Thumbnail or Rounded.
These presets apply your CSS framework's own classes, so what you get depends on whether your site uses Bootstrap or Tailwind (see Site Settings).
Folders are one level deep
The assets/ folder is read one level deep: assets/photo.jpg works, but assets/2026/photo.jpg doesn't — it won't appear in the Assets dialog or in the live preview, and it isn't published. If you're copying files in by hand (or bringing them over from another site), put them straight into assets/ and give them distinct names. The scripts/ folder works the same way.
Graphics for your template: the elements folder
Pictures that belong to your design rather than a page's content — a logo, favicon, background image, icon font — go in the elements/ folder instead, so they don't clutter the Assets dialog. WebHaste creates the empty folder for you but doesn't list or manage what's in it: drop the files in yourself, and refer to them as /elements/logo.png from your template or stylesheet. It's published along with the rest of the site, and is also one level deep.
 Topics